
Using the Viam RDK with the Mini Pupper Robot
Published:
Having used ROS for many years now, I’ve always been curious how other programming middlewares would work in comparison such as a new or different paradigm of structring robotic software, hardware, etc.. However, there doesn’t seem to be many alternatives. The biggest I could find was YARP which I had known about for some time but never tried (Maybe another blog post in the future!). The second closest I found was LCM which isn’t being maintained anymore. Others seem like small projects tied to their respective goal/task in mind. I did, however, stumble upon one that caught my eye by the startup Viam called simply the Robot Development Kit (RDK).
Features
This is an interesting framework when compared to ROS and ROS 2. Instead of being written in C and have official generated interfaces for C++ and Python like ROS 2, the RDK is written in Golang with official SDK support for Python, C++, TypeScript, and Rust. The middleware interface/message communication protocol differs too. Instead of TCPROS or DDS, this solution uses gRPC along with protobuf for generating APIs for each language to support their respective SDK.
A lot of this is in service of using their web interface that users interact with to manage their robot, visualize performance, use WebRTC to get streaming output, and even write code to run. For those that prefer local solutions, you can use the RDK without touching their web offering. This is all a very compelling platform when you see that they also want to be very “batteries included” with robotic hardware. By that I mean a lot of motors, sensors, cameras, and so on are supported within the RDK, and by extension all the SDKs. This is all done by using a viam-server AppImage that is installed on a Pi or other Linux box running the robot. How this works will make sense once I discuss Viam’s software architecture.
From a Computational Graph to a Server-Client Architecture
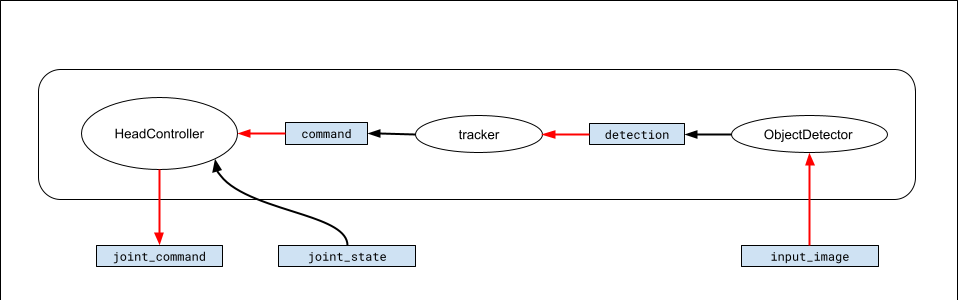
Traditionally, the ROS paradigm of programming a robot is that of a computational graph like the Tiago example above. Each node has a specific purpose (or computation) in the overall graph that comprises the robot. The ObjectDetector detects an object and sends a message to another node that tracks the object, and then a resulting message is sent to a node that move the robot’s head. Each italiczed phrase is a set of computations that encompass the respective node’s purpose.
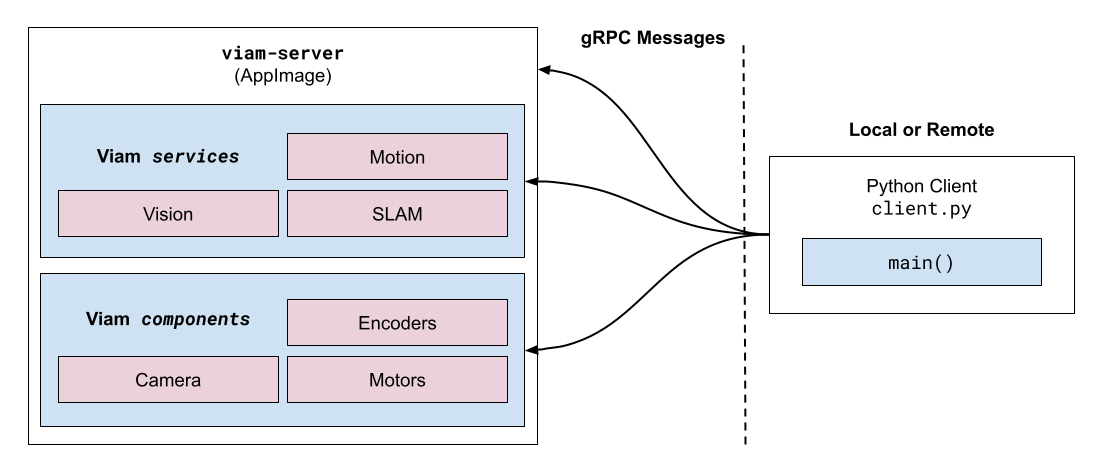
The Viam robot programming paradigm is different. It’s whats know as a server-client architecture, where a user-configured server can interface with hardware while receiving input from a client program or interface. The server can run secondary services which the client can also interface with for more specialized behavior. If this sounds familiar, it is because Boston Dynamics uses a very similar architecture for their Spot robot. Esstentially, Spot robot acts as a server and runs services that recieves gRPC messages from a client to move the robot, get images from its cameras, etc.. Viam allows you to create a similar design for your robots.

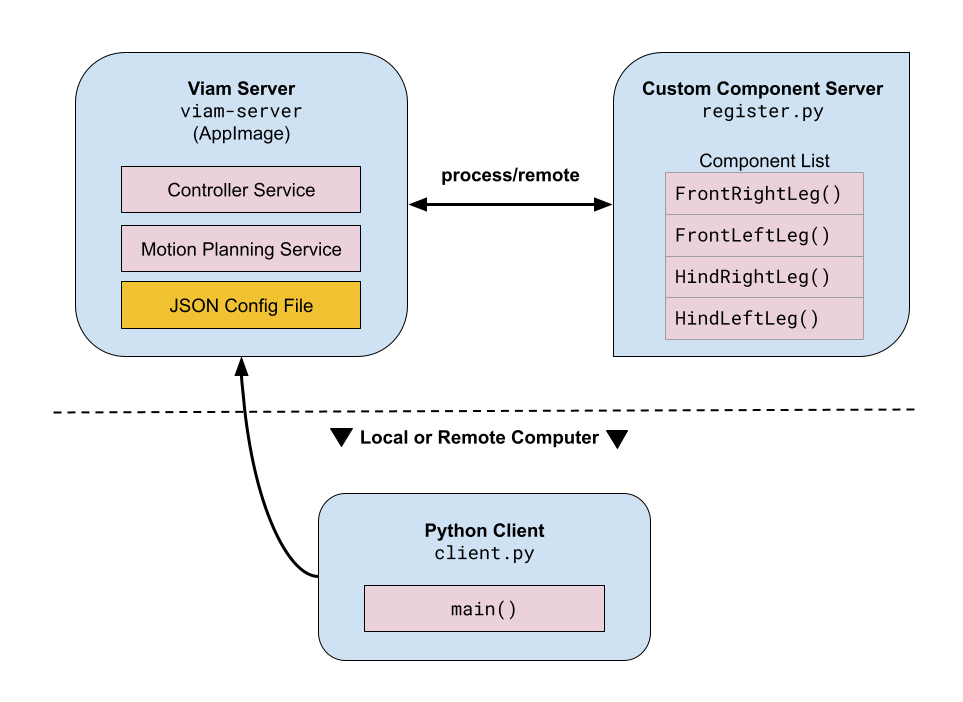
Now compare this to how Viam does this:
As you can see, it’s remarkably similar to Boston Dynamic’s architecture. One important point to raise is Spot’s server and services implementations are black boxes; users can’t access them or see the code that runs on them. This makes inferring how they structure their system difficult compared to Viams which is mostly open source. However, we can safely say the systems are both similarly structured. One concept Viam brings forth is components, which are hardware primatives that you can combine to structure your robot’s hardware. For examples, if you are making a differential drive robot, you would use 4 motors and possibly 4 encoders. A client or service can then interact with these 8 running component drivers that the server will spin up.
Mini Pupper Example
Conceptually, Viam’s architecture seems straight-forward, yet I still believe the best way to learn something new is to actually use it in tandem. Therefore, I decided to test out Viam’s Python SDK on the Mini Pupper. The V1 originally shipped with a host of Python files dedicated to running the system with a controller. I reworked these files and added the Viam spin to make it work. The source code is located here. The file structure is similar to a pure python package you would normally find online. Inside the souce folder I label my client.py to interact with the viam-server and run the robot and register.py the runs a custom component server (more on that later). A component directory contains all the custom components needed to run the Mini Pupper (more on this later as well). Before setting up Viam and working with this example project, we need to install MangDang’s BSP packages and additional setup as specified on the examples README.
Once the prerequistes are installed, we can install the viam-server on the pupper’s Raspberry Pi. To do this, download the viam-server distributed on their website as an AppImage (a self-contained executable program image similar to how macOS programs are distributed but for Linux). This provides the drivers to run a lot of hardware components out-of-the-box, which is configured with a JSON file upon startup. For example, the current project requires the use of a PS4 bluetooth controller, so I would create a JSON file and add a gamepad component like the following:
{
    "components": [
        {
            "name": "PS4 Controller",
            "model": "gamepad",
            "type": "input_controller",
            "attributes": {
                "dev_file": "",
                "auto_reconnect": true
            }
        }
    ]
}
Other Viam hardware components can be added in a similar manner. If I want to add a motor, I can just append it to the list following the gamepad one. This way the viam-server knows what components it will receive gRPC messages for from a client. The particular gamepad component needs a Viam service to translate our gamepad inputs into values we use in our client program. Services are added in the same way to our JSON file.
{
    "components": [
        {
            "name": "PS4 Controller",
            "model": "gamepad",
            "type": "input_controller",
            "attributes": {
                "dev_file": "",
                "auto_reconnect": true
            }
        }
    ],
    "services": [
        {
            "name": "My Controller Service",
            "type": "base_remote_control",
            "attributes": {
                "input_controller": "PS4 Controller"
            }
        }
    ]
}
Here we added the gameplay service to control our Mini Pupper. Just like the components, you can string them together by appending more services to list following the gamepad one. The online Viam App provides a nice web GUI to add components and services.
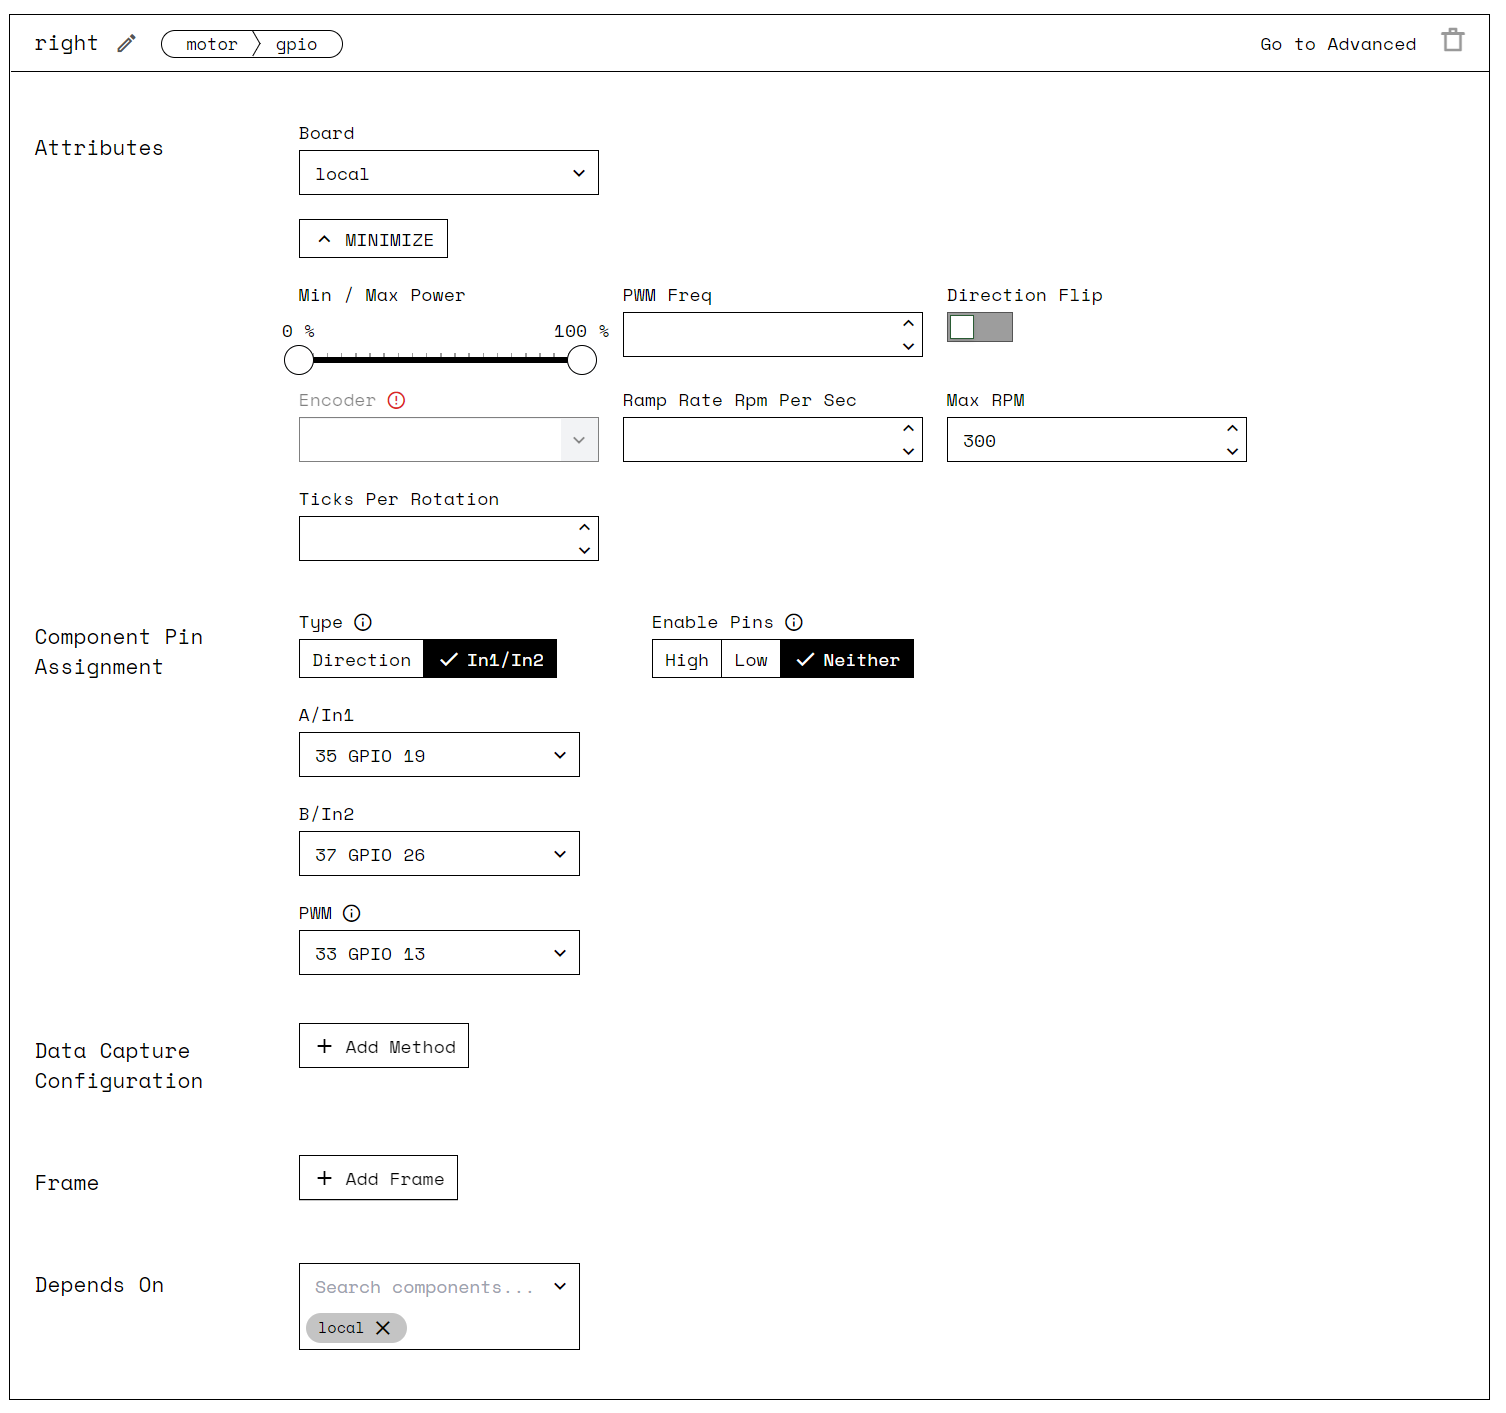
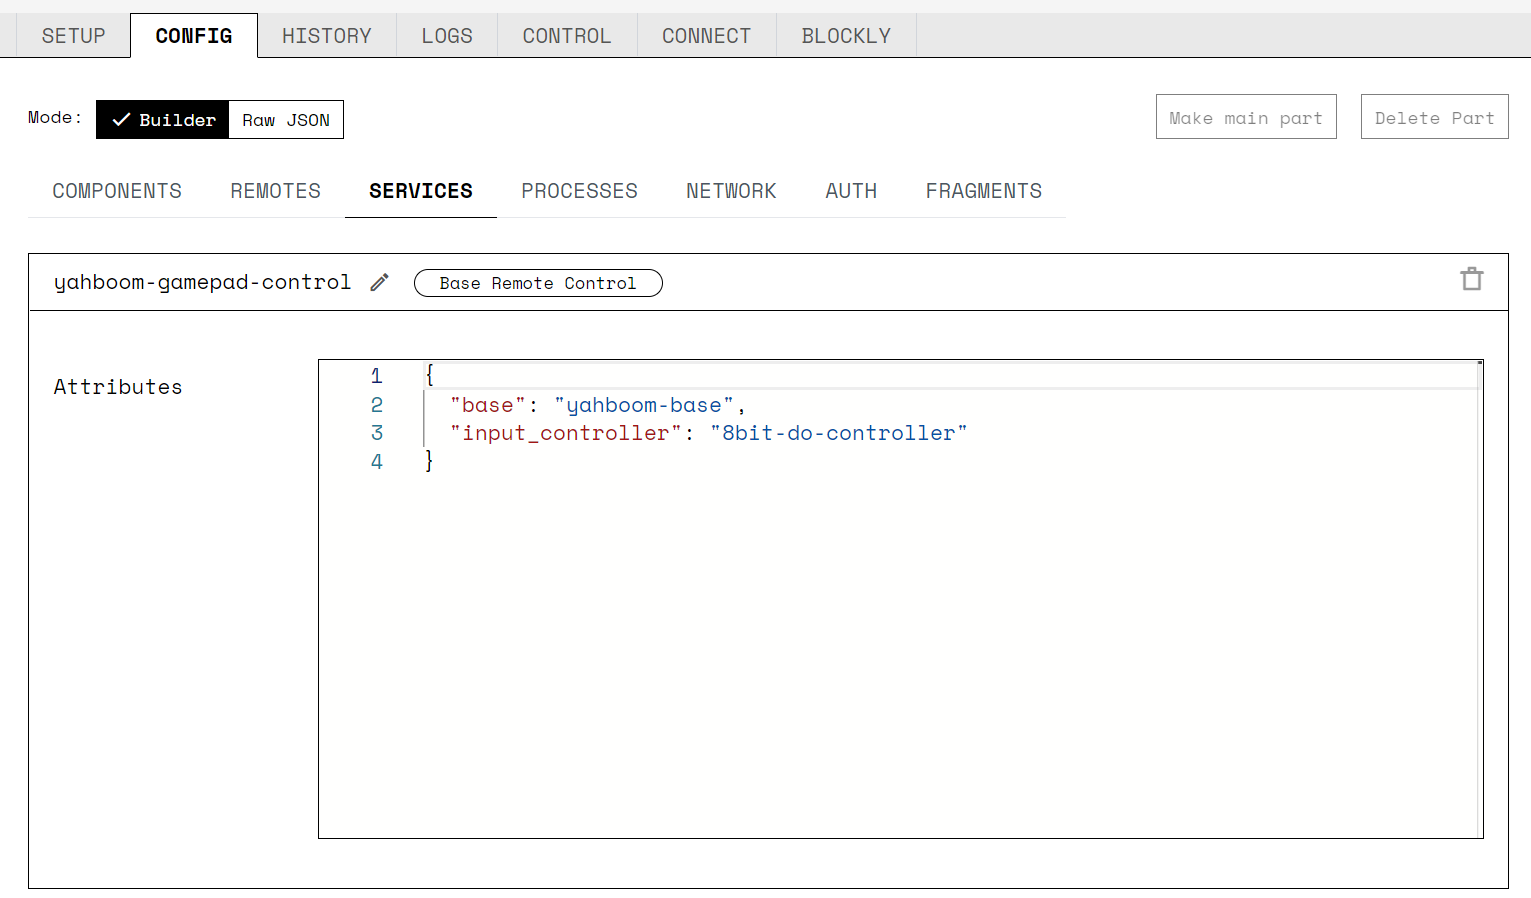
This can be a huge help to users not comfortable with writing robotic code on a local machine.
Custom Components
One thing you may have noticed looking at the Mini Pupper’s Viam architectural figure, is the point of a custom component? Like an OS, if you plug in new hardware into your machine you have to find or write drivers for it to use. The same applies for hardware components or configurations that may not have built-in support for with the viam-server. While the individual servos are supported, three servos act in unison to produce hip abduction/adduction, hip flexsion/extension, and knee flexsion/extension are not. Viam’s custom components allow us to subclass one of the hardware primitives they use for their baseline componentes, which looks something what was written in leg.py:
class PupperLeg(Arm):
    """Mini Pupper Viam subclassed component."""

    def __init__(self, name: str, leg_idx: int):
        self.pwm_params = PWMParams()
        self.servo_params = ServoParams()
        self.leg_idx = leg_idx

        # Starting joint positions
        self.joint_positions = JointPositions(values=[0, 0, 0, 0, 0, 0])
        self.is_stopped = True
        super().__init__(name)

    async def get_end_position(
        self,
        *,
        extra: Optional[Dict[str, Any]] = None,
        timeout: Optional[float] = None,
        **kwargs,
    ) -> Pose:

    async def move_to_position(
        self,
        pose: Pose,
        world_state: Optional[WorldState] = None,
        *,
        extra: Optional[Dict[str, Any]] = None,
        timeout: Optional[float] = None,
        **kwargs,
    ):

    async def get_joint_positions(
        self, extra: Optional[Dict[str, Any]] = None, **kwargs
    ) -> JointPositions:
        return self.joint_positions

    @run_with_operation
    async def move_to_joint_positions(
        self,
        positions: JointPositions,
        extra: Optional[Dict[str, Any]] = None,
        **kwargs,
    ):
        operation = self.get_operation(kwargs)

        self.is_stopped = False
        self.joint_positions = positions

        for axis_idx in range(3):
            send_servo_command(
                self.pwm_params,
                self.servo_params,
                self.joint_positions.values[axis_idx],
                axis_idx,
                self.leg_idx,
            )

        if await operation.is_cancelled():
            await self.stop()

        self.is_stopped = True

    async def stop(self, extra: Optional[Dict[str, Any]] = None, **kwargs):
        self.is_stopped = True
Our Leg class subclassed Viam’s Arm component class since some of its methods are for position and joint control similar to that of a leg. The commands I want to use are only for joint control, so I only filled the methods related to those. The others can remain blank. We put these custom components in a componenets folder within our Python project. We can then run an additional server referred to as remote which will interact with our viam-server and be able to recieve gRPC messages from our client.
Writing our Client Application
Now that we have the server portion complete, we can begin writing our client application. We do this by asking the viam-server for a RobotClient object that will allow us to connect and make calls to the robot. We can create a helper function like the below:
from viam.robot.client import RobotClient


async def connect_to_viam_server() -> RobotClient:
    """Connect to Viam Server."""
    opts = RobotClient.Options(dial_options=DialOptions(insecure=True))
    return await RobotClient.at_address("127.0.0.1:8080", opts)


def main():
    robot = await connect_to_viam_server()
The helper function is then assigned to the robot object; however, notice that we use an await when assigning the client to the robot variable. Viam makes extensive use of async, so it’s a great idea to familiarize yourself with Python asynchronous concepts when trying to learn. We will show later that starting the viam-server locally will serve connections at 127.0.0.1:8080 by default. Now, we can make calls to components or services that are running on the viam-server as defined by our JSON config file.
Now, we can use our connection to our robot. Let’s say we have a robot arm connected and configured with our viam-server named arm0, we can connect it simply by linking our newly created robot object to an Arm component class as such:
from viam.components.arm import Arm
from viam.components.arm import Pose
from viam.robot.client import RobotClient

...

    arm = Arm.from_robot(robot, "arm0")
    await arm.move_to_position(Pose(x=0, y=1, z=2, o_x=3, o_y=4, o_z=5, theta=6))
    position = await arm.get_end_position()
    print(f"Arm position is: {position}")
The Arm class takes two arguments: the robot object and the name of the component as defined in the JSON file used with the viam-server. This prevents any errors caused by using multiple components of the same type. After defining our arm, we issue a command. The arm component has a pre-defined set of functions to manipulate the robot. the one we will use here is the move_to_postion call that takes a Pose proto argument. Though our inputs are nonsensical, this would issues a command to the arm if we had one connected. Other calls suchs as get_end_position will return the Pose proto with the arm’s current position.
With this, we can devise control loops to maintain a certain functionality from our robot. As long as the robot variable contains the RobotClient within scope, the client will always have access to the different components and services that the viam-server is configured to provide.
Additionally, if we have a custom component running on a remote server we can access it in the same manner as the viam-server.
async def connect_to_remote() -> RobotClient:
    """Connect to custom remote server for robot components."""
    opts = RobotClient.Options(dial_options=DialOptions(insecure=True))
    return await RobotClient.at_address("localhost:9090", opts)

...

robot_custom = await connect_to_remote()
When running the remote server, it should spit out an address that it serves these custom components. Make sure to use that address when connecting your RobotClient to it. Now you can use this, like above, to attach robot_custom to your custom hardware pieces.
Running the Mini Pupper
We can run our Mini Pupper with Viam now that we have a baseline understanding of how the architecture works, but, first, we must install the repository and make sure our prerequiste setup is ready per the README instructions. Once installed, we will need four terminals open or a tmux with four windows.
First Terminal Window: Connecting the controller
We’ll need to connect our controller to the Raspberry Pi to retreive key presses from the viam-server. First, we’ll use the bluetoothctl tool to scan our area for bluetooth devices. Make sure to put the controller in a pairing mode while we run the following command.
~$ sudo bluetoothctl scan on
We should get an output that looks like this.

Make sure to pay attention to the set of characters with the colons, :, since the address paired with the device name should be what we want to connect to. Once we know the address, we can connect using this next command.
~$ sudo bluetoothctl connect CONTROLLER_MAC_ADDRESS
Second Terminal Window: Starting the viam-server
Now that our hardware is connected, we can run the viam-server with our JSON config file. Add the following contents into a JSON file using vim or nano.
{
    "components": [
        {
            "name": "PS4 Controller",
            "model": "gamepad",
            "type": "input_controller",
            "attributes": {
                "dev_file": "",
                "auto_reconnect": true
            }
        }
    ],
    "services": [
        {
            "name": "My Controller Service",
            "type": "base_remote_control",
            "attributes": {
                "input_controller": "PS4 Controller"
            }
        }
    ]
}
Name the file whatever you wish. I’m creative, so I named it my_config_file.json. Now we can start the server with the JSON file as an argument.
~$ sudo ./viam-server -config my_config_file.json
Third Terminal Window: Starting our custom component server
Since we have a custom component, we will need to start up our remote server containing the new server code located in the repository as remote.py.
~$ cd viam_minipupper_py
~$ python3 remote.py
Now the viam-server and our client has access to our custom components.
Fourth Terminal Window: Starting our client script
Finally, we can run our control loop contained in the client.py. This file will connect to our viam-server and our custom component remote server to control the legs of the Mini Pupper using a playstation controller.
~$ cd viam_minipupper_py
~$ python3 client.py
Thats it! We have a working robotic pupper using Viam now!
Summary and Other Thoughts
While my time using the platform has been fun, I do notice some drawbacks though. They do have a bit of catching up to ROS’ middleware offerings. In particular, visualization tools like RViz and a decent simulation interface for something like Gazebo, Unity, or, my underdog favorite, [Webots. The Simulation and RViz functionality isn’t that big of a deal since extensions and plugins could enable them to work with the Viam RDK. Another interesting drawback is the lack of a luanch file-like system; however, using the Viam online app for configuration allows you to do all this at once.
I always tell people that their isn’t just one way to do something. Design choices have positives and negatives depending on the application for which we wish to use it. For those who are new to robotics, I think this is an interesting starting point for people compelled by a component-based architecture rather than a computational graph. This may also appeal to experts who want to commercialize their system for use similar to how Boston Dynamics does it. Who I think this would really appeal to are those trying to create web-based frontend solution. First-party TypeScript support would be huge to making web-based applications. In the end, Viam is a fascinating new platform for robotic systems and I wish them continued success. More competition in this space is good. Even for robotics!